Showing posts with label Close To My Heart. Show all posts

Saturday, February 22, 2014

Picture My Life Balloon Ride Scrapbooking Program from Close To My Heart

I'm very excited about Close To My Heart's new Picture My Life Scrapbooking Program and wanted to share the first kit I've gotten.  I've been doing Project Life style scrapbooking for 5 years now and was looking for something a little different and found it with this set.
*Disclaimer: I am a Close To My Heart Independent Consultant
Whether you are a traditional scrapbooker or a pocket page scrapbooker the Picture My Life Balloon Ride set will definitely add a beautiful vintage-y look to your pages/layouts.
The highly anticipated package arrives!

3 x 4 card pack

4 x 6 card pack

Two sided Title page

Other side of two-sided Title Page

Fronts and backs of 4 x6 cards
Three cards of each design

More 4 x 6 cards

More 4 x 6 cards

More 4 x 6 cards

3 x 4 cards
Three each of 26 designs

More 3 x 4 cards

More 3 x 4 cards

More 3 x 4 cards

Balloon Ride paper pack
Not a part of the Picture My Life set-
a great way to make your own cards or to add
traditional layouts to your album along with the pocket page scrapbooking

Balloon Ride Complements
Not a par tof the Picture My Life -
cardstock embellishments to add dimension to your cards
or traditional layouts

More Balloon Ride Complements
cardstock embellisments
 For more information, please check out my business website at:
http://craftycreativity.ctmh.com/
Have you tried pocket page scrapbooking (Project Life)?

Saturday, January 11, 2014

Designed Decor Colonial White Frame


Holidays are over but I didn't have a chance to share photos of this gift before I sent it across the country.  Last fall I shared what I did with Close To My Heart's Designed Decor Black Frame with Halloween photos of my grandson.  This time I did Christmas photos from his first 3 Christmas'.  I love that these are so easy to do and get oohh's and ahh's from everyone who sees them.  All it took here were a couple of photos some colored clips(clothespins-these are popping up everywhere) and some of my scrapbooking stash!
I gave a set of these frames to my other son and daughter-in-law who don't have children and they were just as excited to get them.  They will be using one for pet and vacation photos and using the other for appointment cards, notes, etc.  
Lots of different ways to use them.  
For more information on either frame go to:
craftycreativity.cthm.com

Sunday, November 24, 2013

End of year giveaway


 End of Year Giveaway

On December 26th I will be giving away the following Close To My Heart products:
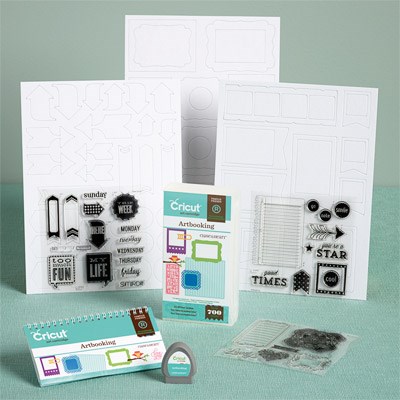
  • a Cricut Artbooking Collection
  • a Designed Decor Frame in either white or black
  • a My Crush book (similar to SMASH book)
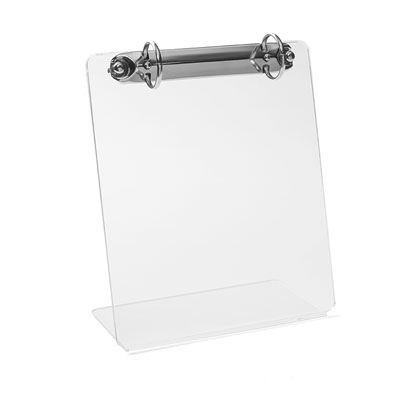
  • Designed Decor Flip Stand Album
  • 3 stamp sets  
In order to be eligible to win one  of these five items just place an order on my Close To My Heart website: 

http://craftycreativity.ctmh.com

between now and December 24th.  For each order placed, your name will be entered into a random drawing to be conducted on December 26th with the winners announced here and on my Close To My Heart Lynn Wigren Facebook page on December 26th.   Any order over $50 will have an additional entry in the giveaway as well. Here is a look at the items you could win......


Cricut Artbooking Collection

Take yoursCcrapbooking to never-before-seen levels with the new Cricut® Artbooking collection! With oodles of images in each of 15 layout themes, you can create several coordinating pages for each theme using just two keys and one dial size. Images include accents, borders, titles, overlays, photo mats—in standard photo sizes!—and more. The Cricut® keys are optimized for creating 12" × 12" pages in a jiffy. You'll also love creating 10 themed mini books, also optimized for several different sizes using just two keys and one dial size. When you're finished cutting, use the coordinating stamp sets and Dimensional Elements shapes to add even more pizzazz!

Collection includes:
1 – Cartridge (700 images: Font, Mini Books, Layouts)
3 – My Acrylix® D-size stamp sets
3 – 12" × 9" Dimensional Elements (3 sheets of different shapes)
Creative Feature Keys: Title, Photo Mat 1, Photo Mat 2, Icon, Border, Overlay.
Recommended blocks for included stamp sets: 1" × 1" (Y1000), 1" × 3½" (Y1002), 2" × 2" (Y1003), 3" × 3" (Y1006), 2" x 3½" (Y1009), 4" × 5" (Y1012).
Cricut® is a registered trademark of Provo Craft & Novelty, Inc. All rights reserved.

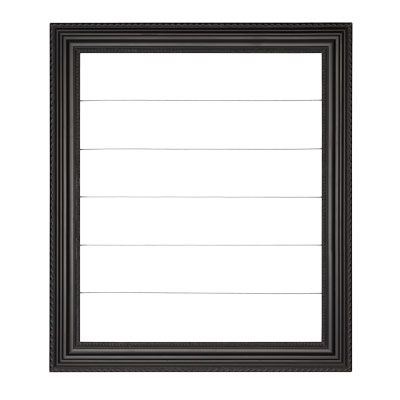
Designed Decor Frame
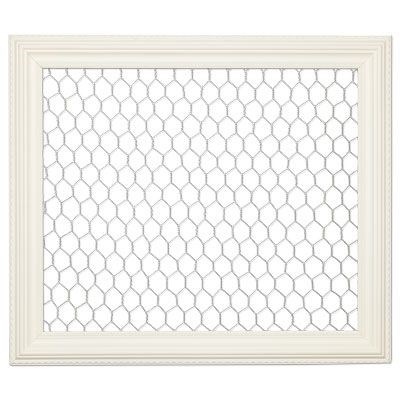
Your choice of the white or black frame.


Designed Decor Flip Stand Album
Over the next week I will have photos of the 3 stamp sets and the My Crush book along with more details on all of the products.  
Any questions, leave a comment or email me at laew@aol.com

Saturday, November 16, 2013


The beautiful sunset caught our eye as soon as we walked out of Olive Garden.  I quickly grabbed my camera from the car fearful that I would lose it before I could get the photo.  I got a few funny looks from other people arriving or leaving as I stood in the parking lot taking photos.  As I turned to go back to the car I saw the moon coming up in the west and the sky with a totally different look. 
 I was very thankful to be in the 
right place at the right time.
What were you thankful for today?

As you can see, I did something different with the photos for today.  I placed them in a Close To My Heart 4 x 6 Flip Flap.  It means that I will have to take the page out of the protector to turn the photo to see the second one but this way I didn't have to choose between them or crop them.

Sunday, October 20, 2013

Kraft Pocket Album Inspiration


Today's video focuses on one of the items shown in yesterday's video about My Creations Craftable Containers.  The Kraft Pocket Album has many uses and in the video it is created as a Family History album.  Check the video out for additional ideas and inspiration.


For more information or to order you can go to

Saturday, October 19, 2013

My Creations® Craftable Containers - More great gift ideas

I 


I'm loving these Close To My Heart videos and am working on my next order.  I'm catching up on several of them as I am confined to resting today.  I slipped this morning as I got of a bed, turning my ankle and ended up getting x-rays of my right ankle.  The swelling was pretty impressive and while the doctor thought it might be fractured it seems to be only a sprain.  I now have an aircast and crutches.  So I'm spending the day in bed with my leg elevated and an ice pack on my ankle. I'll be off it the next day or two at least.  We'll see how the swelling goes.  
Anyways, this gives me the opportunity to start thinking about the holidays and making a list of things I still need to get for gifts I want to make.  So if you find yourself with a quiet or rainy day watch the videos along with me for ideas and inspiration.  

Monday, October 14, 2013

This is the Close To My Heart Designed Decor Black Frame.  Simply add your favorite photos, embellishments and/or notes/journaling, really, whatever you feel like. It's only limited by your imagination!


The bottom photo is a close-up of the lower half and the photo above that is a close-up of the upper half.
This was really simple to do and did not take much time.  The stamped card was made with Close To My Heart's September Stamp of the Month "Poster Tidings"

I'm making several of these as Christmas gifts this year.  I think these would also make great gifts for weddings and baby showers.

For more information or to order go to my online store http://craftycreativity.ctmh.com

Saturday, September 21, 2013

Fall Bucket List and Cricut Artbooking Cartridge>"?

Last weekend I started a couple of projects and I'm in the process of finishing them this weekend.  One of them is my Fall Bucket List.  This project gave me the opportunity to start playing with my new Cricut Artbooking cartridge.  I haven't even started playing with the 3 stamp sets or 2 sheets of chipboard shapes that came with the Cricut Artbooking Collection!

One of the items in the cartridge I was really excited about were the variety of overlays available on the cartridges.

I hadn't even thought of how much use I would get from the same overlay shape by changing the color of the cardstock or the position of the overlap.  The white and yellow overlay are the same overlay.

Plus you can change the size of the overlay.  This overlay is part of the Christmas mini-book.

So I played with the color of the overlay and the base cardstock until I found a combination I liked.

Then I added some print paper and cut it the size of the overlay.  Base cardstock is 12 x 12 inches and the print paper and overlay is 11 x 11 inches

To increase the sense of depth I added a variety of color blocks cut from cardstock to some of the overlay openings leaving some open to see the print paper.  I can't wait to use these overlays and adding photos to them!

Here is the finished Fall Bucket List after embellishing it.  

A close-up of the left page.

And the right page.
Close-ups of various sections of the two pages so you can read parts of the list.

I used a variety of items to embellish the pages which gave me an opportunity to use up items in my stash some of which I've had for years.  A lot of items  were leftovers from sets.  Always good to use some things up.

I typed the list of items on vellum and then cut them out.

There are no photos but I'll use this 2 page layout in my Project Life album to introduce the "fall" section of the year.

Fall is my favorite time of year.  I love all the colors so creating this was a lot of fun!  This is my second seasonal bucket list.  I don't expect to do everything on the list but it comes in really handy when my husband and I look at each other at the end of a long workweek and say "what do you want to do this weekend?"  Summer and fall always seem to go so fast and it's a great way to make sure you do all your favorite or some "new" favorites before the season ends!

Do you create "Bucket Lists"?  If so, what kind?

For more information on the Cricut Artbooking Collection please click on the Close To My Heart icon to the right of this post.

Thursday, September 12, 2013

Artboooking Made Easy (S01E02): A+ School Layouts

I am so excited to share this video with you!  I am so impressed with the Artbooking Collection.  I think this is the most versatile Cricut cartridge there is.  This video shows elements made with just two of the keys!  I'm playing with the cartridge here at home and hope to have some elements to show you soon.  Until then check out this video and let me know what you think.  For more ideas and inspiration check out my website http://craftycreativity.ctmh.com

Sunday, August 4, 2013

Close To My Heart

Here are just 4 reasons why I've decided to become a Close To My Heart Independent Consultant - AGAIN!
Amazing new products affordably priced and I love having my own business!  Three of these items are on their way to me and I can't wait to show you all their potential.  I included links to the full description of these items on my Close To My Heart website
http://craftycreativity.blogspot.com
so you can check them out yourself.  For those of you, who like me, are into Project Life, art journal and mixed media this Cricut cartridge has items for you as well as for scrapbooking!


Cricut Artbooking Collection

My Crush - Modville
Not yet available


Designed Decor Frame


Designed Decor Black Frame
Let me know what your first impression is.

Monday, January 7, 2013

One Little Word - January 2013


Here's a look at how my One Little Word (OLW) pages are shaping up for January.  I mostly stuck to Ali Edwards' instructions for the prompt.  All the materials I've used I had on on hand.  They include:
Close To My Heart's My Acrylix stamp set "Atomic Caps" for the word "SEEK" on each of the cards.  I had some trouble figuring out how to include the other words on the cards since mine were much longer words than Ali's 3-4 letter words.  I used Creative Memories Mini Alphabet stickers that I've had forever and changed up the colors to match the kraft cardstock and the Cranberry ink (from Close To My Heart) on the word "SEEK".  The washi tape is some I got in a SMASH pack.  I had some problems with that as it did not want to stick very well on the cardstock.  I've heard that's a problem with washi tape.  I used Close To My Heart ink "White Daisy" for the months on the kraft cardstock. For the months I used Close To My Heart's Nov. 2012 Stamp of the Month "Capture the Date".  My color scheme developed from the kraft cardstock and the washi tape I had on hand and built from there with other materials in my stash.  That's how its worked in the last 2 years as well.  Other than the page protectors and album I've never bought anything specifically for OLW.
For the print paper I had DCWV's Tradewinds Matstack tucked away.  It was another purchase made just because I like the look of it.  I do have to say though that I don't have a lot of print paper on hand so my choices were limited.  Even so this paper really spoke to me.  I originally had pulled some of Tim Holtz's papers out for this but once I saw these there was no question this was the right one.
While this isn't finished yet I'm going to set it aside for the week and revisit this next weekend.  In the meantime I need to find or take a photo of myself (never one of my favorite activities).  I want to sit with my word for a few days.  I'll probably add more thoughts to my month cards.  I'll be looking through my stash more - I think I have a key somewhere I'd like to add to the one print card.  I'm not a fan of butterflies or birds just because they are everywhere(...gasp...I know its such a big trend...but up to this point butterflies/birds just haven't done anything for me) so I don't think I have any of those but I'll check to be sure. They certainly would work symbolically for my word "SEEK"
So that's it for now....Are you doing One Little Word or a variation of it for 2013?  Please share....

Tuesday, February 14, 2012

The Curious Scrapbooker's Field Guide with May Flaum


Week 1 of May's class has been all about misting.  I have about 6 or 7 various mists and have tried it (sort of) a few times but didn't really feel like I knew what I was doing so it wasn't necessarily fun.  I've been misting a few tags and papers based on what we learned this week and I think I have a better idea of what I'm doing and how the mists work.  Here's the layout I did tonight......
I found a box that will even fit 12 x 12 sheets of paper for my misting.  I didn't
like cleaning up the mess misting made without it before.

I used a Tim Holtz mask from his Timeworks set.

I used Tattered Angels GlimmerMist - Creme de Chocolat to mist Close To My Heart cardstock (colonial white).
I added a 2 1/2 inch strip of textured brown cardstock (not sure where I got this paper.  I added ribbon above and below the paper strip.
The cardstock did curl after I misted it.  I'll have to put some weight on it to flatten it.  May also told us that
we could iron our items that curled.

Finished layout.  Added photo over cardstock/ribbon strip.  Added acrylic piece with "thankful" on it over the masked area.  Added cardstock brown Thickers to make the word "for".  Rub-ons added "family" and "happiness is..." from Close To My Heart.  I then added black DewDrops to bring the eye to the photo.

I was very happy with the look of the misting.  It covered the cardstock very evenly and I didn't have a lot of big splats or drops.  In the class May explained the various types of mist, what they are made of and how they work which helped me understand how to use them better.  She also said that its a matter of working with them -I should say playing with them and practicing the various techniques to get the look you want. 
My scrapbooking style is typically very basic, clean and simple and I like that I can stay true to that but add a feeling of more depth to my layout.
I can wait til Thursday's class!  Thanks, May!